 New York is a crazy fast-paced place buzzing with activity. I have been getting a lot of questions about the Sonorus STUDI/O Card and Cubase.
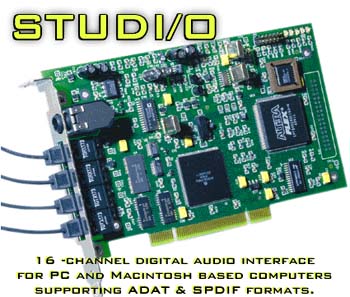
For those of you not familiar with the STUDI/O card, here is the quick and simple:
- Two 8-channel, 24-bit Alesis ADAT optical interfaces
- High-resolution, 18-bit, ¹" stereo analog monitor/headphone output
- Full Windows audio drivers for PC and Cubase VST (PC & Mac) so it works with your existing software
- Supports 96khz recording
Each interface is configurable to ADAT or SPDIF (2 channel) optical, with real time stereo sample rate conversion.
This application note describes how we recorded 16 channels in Cubase VST/24 at 16 bit resolution and how we recorded 9 channels at 24 bit resolution, locked to two ADAT XT20 s (of course, the 24 bit files had only 20 significant bits - the resolution of the ADATs).
Hardware |
Software |
Pentium-II 300MHz |
Windows 98 Lite |
With this setup we were able to record 16 channels (9 channels at 24 bits) from the two ADAT XT20's into the computer. We just couldn't squeeze the extra channels out of a single hard drive at 24 bits.
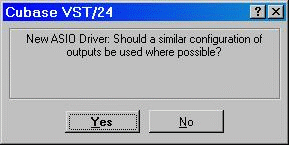
When you start VST 3.7 you will encounter these 2 dialogs:
and
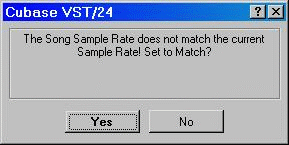
Answer yes to these Windows. Cubase will detect and change any frequency it finds or is set to.
Here are the pertinent setup screens in Cubase:
|
|

Fig. 3 & 4 - 16-bit and 24-bit Audio System Setup Windows.
By clicking on 'System' in the Audio pulldown menu, you can get to the Audio System Setup Window. Here you must set the number of channels you want to use in your song, which can be more or less than the number of inputs/outputs you have and can always be adjusted later. This is also where you select the sample rate you will be working with - make sure it's the same as the audio you're recording or playback will be too fast or too slow!
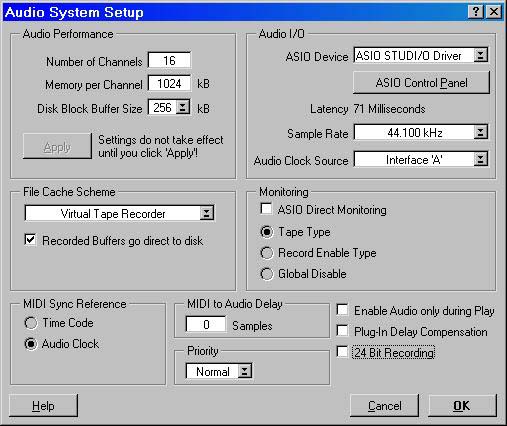
NOTE: Cubase 3.7 defaults to the top clock source (Interface A) every time it starts up. If you had previously selected "Internal" as the clock and there is no clock at Interface A, the next time Cubase starts, it will not find any frequency at Interface A and display a number of invalid sample rates. Each time you acknowledge the dialog a different sampling frequency is presented waiting for acceptance. The ASIO 2 driver now allows control of the clock source from software. Because of Cubase default, if you have been clocking internally, you will get the multiple sample rate dialogs. The solution is to set the studio to "Internal". This will satisfy Cubase and you can then set the clock accordingly after it starts up.
We selected 'Global Disable' for the Monitoring type: it's the most CPU-efficient mode, though you may want to sacrifice some CPU cycles in order to get monitoring through Cubase's VST engine (as illustrated, otherwise, you could employ our on board mixer for monitoring functionality, or use your mixing board if you have one).
If you're having some problems with recording, you may want to tweak the 'Memory per Channel' and 'Disk Block Buffer Size' settings. As you can see above, we had to adjust the Disk Block Buffer Size to achieve 24-bit recording. Remember, the settings you see are the ones that worked best for us; every computer is different, so they may have to be changed. In general, the more memory you give to each, the more 'forgiving' Cubase is of system inefficiencies. Although, Disk Block Buffer Size sometimes has to be lowered for better performance on faster machines....
You can also see what your current ASIO latency value is here. 68ms worked best for both recordings, but we've gotten it down to 45ms and still successfully recorded 16 channels at 16 bits. Pressing the 'ASIO Control Panel' button will launch our control panel, where you can change the latency and reserve specific I/O channels for use by WaveAudio. This can be used for example to run WaveLab within Cubase as your sample editor, and listen to audio within that application without quitting Cubase.
For 24-bit recording, be sure to enable the '24 Bit Recording' option as shown in Figure 4. You can also select 24 Bit Recording by clicking the red '24 Bit' button at the top of the Arrange window as shown in Figure 2.
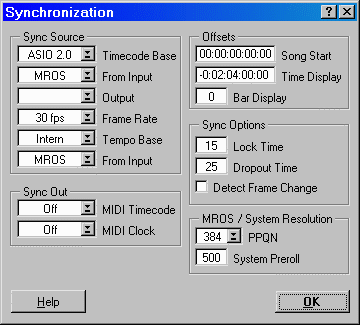
Fig. 5 - Synchronization Window.
In the 'Options' pulldown menu is Synchronization. For any timecode based recording, the synchronization settings must be correct for everything to run smoothly. For Timecode Base use 'ASIO 2.0 from the 'MROS' Input, with a frame rate of 30 frames per second. You can use any frame rate you want. The offset is used to set the start time of the song (corresponding to the start time of the song on the ADAT). Notice the Time Display -- this is due to the ADAT offset of 2 minutes encoded into the formatted tape.
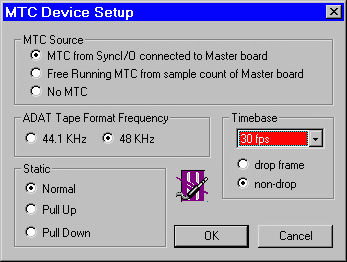
In the Studio Control Panel there is a new button in the Setups labeled MTC Setup. Clicking this button brings up the above dialog. You will need to set the MTC source to the first selection; MTC from Synci/o. You should match the sample frequency with the one at which the ADAT tape was formatted and ensure that you are Locking to the "A" ADAT for word clock.
If you have an ADAT Computer Interface (e.g. Steinberg's or J.L.Cooper's), you can set the timecode base to ASIO 2.0 MMC - Midi Machine Control - so that Cubase will automatically control the ADAT transports. This would require the Output to be sent to your Interface; ours is hooked up to 'PKX: A' on our MOTU Pocket Express. Then, when you activate 'Sync' on the transport (Figure 12), the ADATs will locate to your Cubase cursor location via MMC, so you'll have fully automated recording and playback.
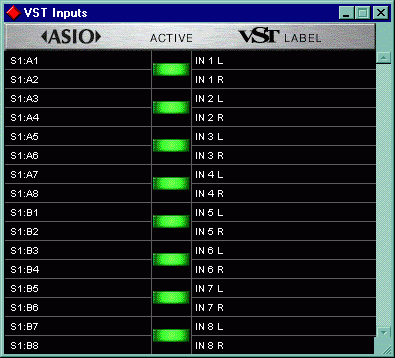
Fig. 6 - VST Inputs Window.
The VST Inputs are found in the 'Audio' pulldown menu. Be sure to turn your inputs 'on' by clicking on the green boxes so the turn a nice bright green like you see here. Since each input is in stereo, each input represents two channels to record, so turning on all 8 will give you sixteen channels of audio. Each pair you activate uses more CPU power, though, so only activate the ones you want to use; and when mixing down, turn them all off to get the most 'horsepower' for your Plug-Ins (you also may want to increase your latency when mixing for the same reason -- more Plug-Ins!). You can also re-label the inputs to your convenience by clicking on the right-hand labels.
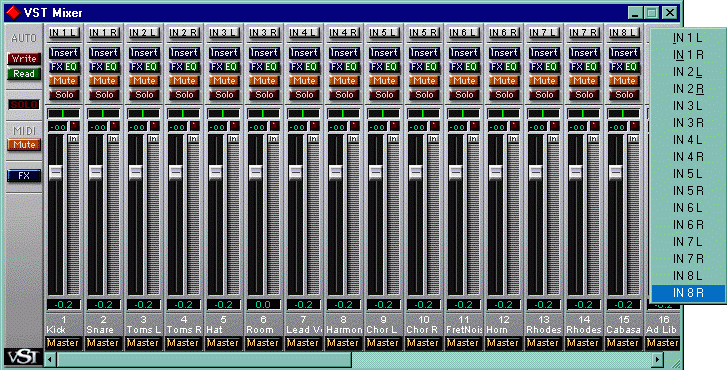
Fig. 7 - VST Mixer Window.
Once your inputs have been activated, you need to assign them to tracks, and this is done in the VST Mixer window. This window can be reached by selecting 'Monitor' in the 'Audio' pulldown menu. Above each channel strip is the button to assign the channels. To do this, you must hold down 'Control' and then click with the mouse to get the pulldown window as shown above. If you don't have 16 channels to choose from, double check the Audio System Setup window and the Inputs window to make sure everything is configured properly. Of course if you don't want all sixteen enabled, you'll only see the enabled ones in the pulldown menu.
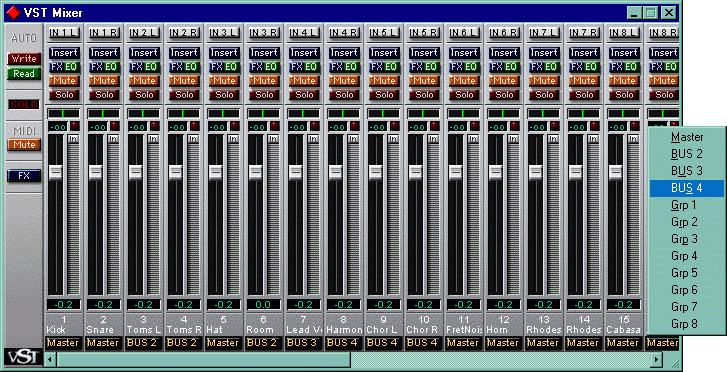
Fig. 8 - VST Mixer Window.
You also use the VST Mixer window to steer the tracks to the output busses (once the busses are activated) or to groups. This is useful because each bus can be turned on and off (in the VST Master window, shown below in Figure 9). You can have the lead vocal on Bus 3 and the chorus on Bus 4, mute the other elements and mix the vocals, making sure the voices are all balanced properly. Or cut the vocals and play the drums in mono to see if they're flaming. You can use the busses and groups to set the master levels of each component of the song. The difference between busses and groups is this: Busses refer to direct outputs while Groups can be used to put individual elements of a song together, after which the group can be assigned to a specific bus if an individual output is desired.
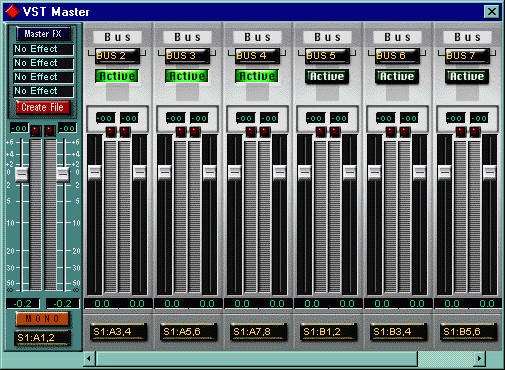
Fig. 9 - VST Master Window.
The VST Master Window, also in the Audio pulldown menu, allows you to determine how many buses are active. Including the Master bus, there are a total of 8 available busses with one STUDI/O. Adding more cards adds more busses. While the Master bus is automatically active, the other eight can be turned on by clicking on the 'Active' button above the bus so that it turns green. In our example, Buses 2, 3 and 4 have been activated. Inactive busses won't show up in this list , so activate the ones you want to use before trying to assign them.
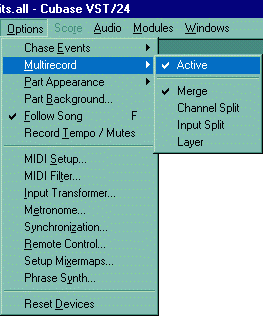
Fig. 10 - Multirecord Menu.
Next you have to tell Cubase that you intend to record more than one channel at a time, so in the 'Options' pulldown menu, highlight 'Multirecord' and click on 'Active.' As long as the check mark is there, you're ready to record. Also, 'Merge' is the proper setting to record audio.
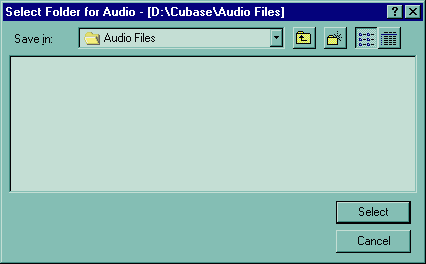
Fig. 11 - Audio Folders Window.
Once that's done, the arrangement window will have an additional column labeled 'R.' You can see this in Figure 1 . Clicking on the 'R' column activates that track for recording. The first track you set to record will bring this menu up, and here you tell Cubase where your audio files will be stored (Fig. 11).

Fig. 12 - Transport.
Finally, here's the way the transport should look. By setting the left locator to '1' (by double clicking on the Left Locator box and typing '1') and activating the Punch In button to its left, Cubase will start recording at Bar 1. We used 'Replace' as our record mode as it seems to work better than 'Overdub' for us. You can also set the song tempo by double clicking on it and typing it in. Finally, make sure the Sync button is activated ('lit') as above. That way, Cubase won't start recording until it gets to the offset point in the timecode. Roll your ADATs back to a few seconds before the offset point, hit record in Cubase, press play on your ADATs and you'll be recording 16 tracks of audio!
Back to the Audiowerks Library
By Anton Bernhardt 1999
© Copyright Anton Bernhardt - Audiowerks.com All rights reserved 1999

